Home60 RAKsFree PatternsCross StitchNeedlepointPainted PorcelainContact Me

Wednesday, December 30, 2015

Lizzy is Wigged!

.....sounds kind of funny, doesn't it? She's "wigged"? Anyway, I digress.

Today I put on her hair and styled it.

Step 1:  Create a realistic hairline by making a wigging cross. As before, Dana Burton of "Miniature Art"  provides a great Youtube video on how to do this.


I have to admit, this is the most challenging step for me. However, I can tell I'm getting better....just takes practice and patience.

Step 2: Once the glue is dry, style the hair. Since Lizzy is a peasant girl, I went with a bun and strands of wayward curls.

Drumroll, please: Herrrrrrre's Lizzy!


I hope you enjoyed the process. It's such a rewarding experience making each doll - I can't describe it. If you think you'd like to give this a try, let me know and I'd be more than happy to help you get started.

Tuesday, December 29, 2015

Lizzy Has Arms!!

Let's give Lizzy some arms next.

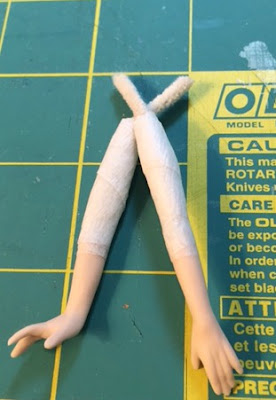
Step 1: Insert and glue pipe cleaner into each arm, checking for length by putting the pipe cleaner into the arm hole of your doll. Then wrap with florist tape to give the arms some bulk or dimension.


Step 2: Make sleeves.


Step 3: Gather lace and glue to wrist. Lizzy has leather arms bands, too.


Step 4:  Glue arms into arm holes, adding a bit of lace around the top.
Voila! She's ready to wig next!!


There is a ton of information and tutorials on the MSAT Doll List. Have fun looking

Monday, December 28, 2015

Let's Dress Lizzy!

Lizzy is starting to take shape!! I promised I'd share how I put these glamorous ladies together - so hang on to your hats - let's get started.

Step 1: Paint her shoes with nail polish.

Step 2: Figure out how tall you want her to be.  (I make mine 5.75 inches tall). Glue pipe cleaners into her legs using Zap-a-Gap (a super glue) and some Aleene's Tacky Glue.

Step 3: Assemble your doll stand. Here's a great video from Dana Burton:


Step 4: Glue your doll to the doll stand. Again, another video from Dana:


Step 5: Make undergarments. Dana really stresses this, as she said people will look up the dolls' skirts. Truthfully, I didn't think people would do that - I mean, I wouldn't. But she was right!! I used four of my dolls to embellish centerpieces for a luncheon I was hostessing. The ladies were admiring the dolls - and LOOKING UP THEIR DRESSES! I actually burst out laughing.

Here's Lizzy in her slip:


Step 6: Using your pattern as a guide, cut it out using paper towels BEFORE you cut your material.
The height of your doll may be slightly different that the pattern, so you may need to adjust it to fit yours. Once you're happy with how the paper towels 'fit', cut your material.

Step 7: Let the dressing begin! Skirt:


You may notice the skirt has some 'movement' to it. How you drape your skirt gives it the movement. It's kept in place by spraying light layers of hair spray.

Step 8: I was so engrossed in making her, I forgot to snap pictures when I made her blouse and then her vest. But here's Lizzy - so far:


Lizzy is sporting a necklace with a tiny silver bead. It's kind of difficult to see, but she has trim around the vest and tiny silver buttons (made from the heads of pins) on top of bits of leather on her vest. I'll get a better picture next time.

Next comes the arms and sleeves. Stay tuned!

OH - and - YES - I'm still stitching. I've been working on the 2015 iStitch Advent sampler. It's on 28 Ct Belfast linen and I'm stitching one over one. I'm kind of behind - only to Day 20:


Wednesday, December 23, 2015

How Do I Make Them? - How I Start.....

Thank you for all the notes and comments about Belle. I learn something new with each doll I make.

I had many people ask how I make them and thought I'd do a series of blog posts about the process. I'm happy to answer and questions you may have. So - here goes:

Q1:  What are the doll bodies made of?
A1:  They are poured porcelain.

Q2:  Do you pour the dolls yourself?
A2:  No - for several reasons. First, pouring porcelain slip is a whole other art in and of itself. I don't have the molds, nor the slip - and really don't want to. I'd rather spend my time in other creative ways.

Q3:  Do you paint the dolls' faces yourself?
A3:  I probably could.....but I've discovered the multi-talented Dana Burton who is a master at pouring and painting 1:12 scale dolls. They're not only elegant, but each and every one seem to radiate a spirit I can't resist.

Q4:  Do they come already assembled?
A4: No - they come in pieces and I put them together. Here's one I purchased off Ebay when I first got started. It's poured and painted by Jan Hughes, another masterful doll artist. NOTE: The squares she's laying on are 1 inch squares.


Q5:  Do you make up the dress patterns?
A5:  I can and have - once. It was FUN, FUN, FUN. Here's Angela, another doll poured and painted by Jan Hughes. The dress and hairpiece were designed by me.


Q6:  If you don't design the clothes for each doll, how do you do it?
A6:  I purchase a kit from Dana. It comes with enough material and viscose (i.e., hair) to dress and wig one doll. I don't HAVE to use the material provided, but usually choose to. Inside the package is an outline of the pattern pieces. Here's what one looks like:


One of the things I love about this art form is I have the freedom to follow the pattern exactly or do my own thing. More often than not, as I get more experience, I find I have more - er - intestinal fortitude <G> to add my own twist to each lady.

OK - so that's how I begin.  I'm going to start Lizzy (the kit I showed you above) this afternoon. I'll snap pictures as I go along and share the process.

If you have any questions, please don't hesitate to ask. PLUS, I'd encourage you to give this a try. Trust me - it's addicting.

Monday, December 21, 2015

Mini Gifts, Belle and Vintage Embroidery Monday

Yesterday was the greatest day - the online mini group I belong to had their Christmas Chat Party and we got to open the gifts we exchanged. Here's what I received from my swap partner:

Can you see how teeny-tiny these things are? Look at those Christmas cupcakes! And - look at those itty-bitty books! Hand made by Jennifer Osmond Hatt from Looking Glass Miniatures - I was floored! This group of ladies that meet twice a week online are incredibly gracious and giving - just like all my stitching friends.

I finished Belle - another of Dana Burton's dolls. Again, I learned a lot - first hairstyle with a braided bun - offset to the side of her head. Ruched ribbon - and I made cording from two strands of DMC floss for the cording along the top of her gown.

 Belle - 5.75 inches tall


Meet Santa Claus. 18 ct canvas designed by Janet Zickler Casey. It was a correspondence course from The Shining Needle Society. I actually signed up for it a few years ago, but just finished the stitching. He won't be finished-finished in time to make it on the tree, but I thought he was cute.

If you have a minute, click on over and visit Super Mom - No Cape! and see what others have stitched up for this week's Vintage Embroidery Monday and Stitchery Link Party.

Wednesday, December 16, 2015

Meet Maree

I finished Maree a few days ago.  Another great kit from Dana.  I always learn something when I make each doll. This one was a particular challenge, as there was a lot of metallic trims. Making the puffs for the sides of her dress was a new experience - a painful one - but I finally figured it out with help from Dana....


 Maree - 5.75 inches tall


Now - off to make the next one!!

Sunday, December 13, 2015

More Lovlies

I received a pleasant surprise in the mail from sweet Jacquie. Is this adorable?


Thank you, Jacquie!!! I love it.

Here are pictures of the little, itty-bitty things made by my fellow miniaturists. These were the gifts given my three of the ladies from the Sunday Bunch (which meets on Saturday - yes, I know, I mentioned that last time, but I think it's a hoot).

From left to right - a flower corsage, a hat and shoes to match and an umbrella. Aren't these sweet? Not sure what I'll do with them - yet - but I've got some ideas swimming around in my head, so stay tuned.

Last, but not least, we did a card and mini exchange in the Miniature Doll List I belong to. Here's the cutest card and mini-door mat and moving boxes from Angelhare Creations, and the sweet Annilee Taylor.

One more exchange to go - opening day is next Sunday. I've already received the goodies and it's KILLING ME not to peek!

AUGH!!!!

Wednesday, December 9, 2015

Miniature Masquerade Masks - 1:12 Scale

Greetings! OK - you know how nuts I am about miniatures. Well, I was invited to join a small local group of like-minded people who love minis - The Sunday Bunch - which actually meets on Saturdays (long story)....Anyway - we had a Christmas Party this past Sunday.

I had a blast!!!!

If you wanted to work on a small (room box) project, through the year, you could. Then those who did them did an exchange. There were several of us who chose to make individual gifts for everyone - there were 10 people who came to the party. Here's what I made - and even made the tiny boxes to give them in -

10 Masquerade Masks - embellished with Swarovski crystals, lots of glitter and teen-tiny beads. I didn't glue the crystals and beads on the handle so they could move up and down. I'll tell you, I had feathers flying all over the place, gilder everywhere, and tinsel - wow - the tinsel - little Emma had a great time taking off with bits and pieces.  Here's what they looked like:


So, "Would you make them again?" you may ask? ABSOLUTELY! What fun!!!

Monday, December 7, 2015

Wonderful Friends and a Finish!

I absolutely love my friends I've met through my blog. They are so sweet and giving -

On that note, I received a chart in the mail from sweet Vickie at "A Stitcher's Story". Once I stitch it up, I'll pass it along to anyone who'd like to make it. Isn't this cute?


AND I was so surprised to get a package in the mail from my dear friend, Debbie B. She made me the most delightful fingerless gloves - and in my favorite color!! The yarn is exquisite -


THANK YOU, Debbie!! What a wonderful surprise package!!

And here it is - drumroll, please!!

COLE'S STOCKING!!!!!!


Christmas Stocking - 20.5 x 12.5 inches

I had a difficult time getting the entire stocking in the picture.....but I'm so pleased with it - can hardly wait to send it to my little step-grandson!

Now - off to look for another stocking to make for my step-grand-daughter (for next year).

OH! And don't forget to stop over and visit Super Mom - No Cape's Vintage Link Party.


Saturday, December 5, 2015

It's Been a Long Time!

WOW! Where has the time gone? I realized this morning I hadn't put up a post to my blog since before I left for AZ to visit family. It was a great time - too short - but it was great to come home, too.

Lots to tell you - but I'll simply post my latest 5.75 inch porcelain doll creation - meet Amal. Another poured and painted by Dana Burton.


Amal - 5.75 inches of Flying Fairy


More later - I promise I won't be gone long!

Monday, November 2, 2015

Embroidery Monday Link Party, OPAMS, Season Exchange Package

Oh my - LOTS to tell you today. You might want to get a cuppa and put your feet up....

First - the Vintage Embroidery Monday and Stitchery Link Party hosted by Super Mom - No Cape!.

Here are three pieces just finished last week (hmmmm....guess these are OPAMs, too).


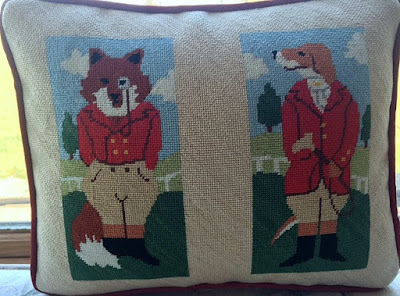
Needlepoint Fox and Hound Box Pillow 10x12 inches


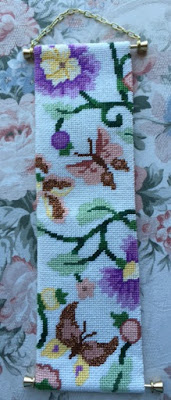
Needlepoint Mini Bell Pull 12.5 x 3.75 inches


Needlepoint Flat Door Handle Ornie 8.5 x 5.5 inches

I participated in a wonderful Seasons Exchange hosted by Kimberly from Creative Chaos. We were paired with someone and we were to share what our favorite season was - My swap partner was Tracy from Mad About Bags.  We both love autumn. Truthfully, she put me to shame with all the goodies she sent me.

An Autumn Banner that's on our screened in porch - and guarded by little Emma from ginormous Bella:


A treasure trove of goodies - crocheted leaves, Autumn themed soap, yummy body lotion, a thimble (it's already in with my thimble collection), beautiful Autumn cards, a sweet scissor fob and a porcelain box with a sweet cross stitch design - filled with buttons (I LOVE buttons!).

An Assisi cross stitch pattern (which I've always wanted to stitch) with threads and Aida:

And last but not least - COOKIES!  CHOCOLATE COOKIES!! Well, at least I can show you the box....the cookies met their demise in short order - HA!


THANK YOU, Tracy - for being such a wonderful and generous Seasons Swap Partner. And a big THANK YOU to Kimberly for hosting the exchange.

Now - off to stitch!!