I was able to connect with
Home School Mom - YIPPEE! So the lost has been found.
Now........on to the Santa Saga. WARNING: Pull up a chair and grab a cuppa, ladies. This is a long story.
Santa is my first soup to nuts polymer clay doll. He was done completely on my own - and not without a WHOLE LOT of learning and more than a little bit of angst and frustration. But I've found when I struggle with something and I figure it out, it stays with me and my skills increase ten fold. With Santa, that mark is in the hundreds - HA!
I shared his face in a previous post. I used Prosculpt polymer clay from
Artdolls.com. It's absolutely awesome to work with. Santa started as a lump of clay, ended up with a face that measured approximately 3 inches from the top of his head to his chin. I wigged (and bearded) him using Tibetan Lamb hair.
I then moved on to his hands. The longest finger measures 1 inch long. Some other factors came into play.....and I ended up sculpting a second set of hands because I wasn't happy with the first.
Than came his boots - these were sculpted and then painted with acrylic paints. Can you see the faux stitching and the strap and buckle? All sculpted with clay.
THEN - the
COSTUMING was next. As they say, "Let the games begin!"
Let me make this clear right up front -
I cannot sew. I'm convinced my sewing machine came with a curse and it does everything within its power to make my (sewing) life miserable.
If you would want to enter a competition, all doll clothes should be removeable. I figured I might as well try the removable bit - who knows what the future will bring....so I'd better use this opportunity to get my feet wet.
Because he's hand made and each and every doll has different dimensions, there was no pattern whatsoever for me to follow to make his costume. None. Nadda. I watched a costuming DVD that was very straightforward. Easy peasy, right? Not for me. (Did I mention I can't sew)?
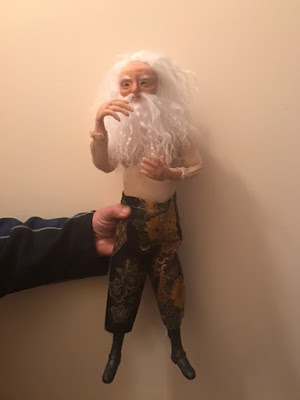
Santa's pants were the first adventure. ummmmmm......it's a really, really good thing I have a LOT of cotton fabric in my stash so I could experiment without actually cutting in to the red velveteen (also in my stash) I wanted to use for his suit. Several attempts making something that (a) fit and (b) didn't look like I'd used cardboard, here's Santa's pants - Hawaiian style:
I won't dare tell you how long to took me to get this far....
And here he is in his red velveteen pants:
Next was to come up with a coat or tunic or SOMETHING. Man, oh man.......I spent DAYS measuring, drawing patterns, sewing, ripping out, sewing some more....I was so afraid to cut in to the red velveteen because I just KNEW I'd mess it up and I only had a limited amount to work with. I ended up making a cotton tunic....after several attempts with scrap cotton, I stitched one that fit - sleeves and all. Mission accomplished. Or was it?
Now the dilemma was how to fasten it closed. I had five adorable tiny black buttons I sewed onto the tunic.....but I knew trying to make button holes was 'way out of my skill level and comfort zone (I was already pushing the envelope on that one). I had an "Ah-Ha!" moment and settled on velcro. None in the house....the weather was awful, so ordered some self-stick velcro dots from Amazon. While waiting for those to arrive, I decided he was going to be a Woodland Santa and he needed a red velvet cape.
I wanted to line it. After (finally) making the cape pattern, attempting to line it turned into another nightmare. Scratch the lining. Eventually I hit the motherland, put my Big Girl Panties on and got out the last remaining red velveteen. Stitched up the cape and was ready to attach the faux fur around the bottom (to match his pants).
The nightmare continues: I had purchased a spool that contained 6 feet of faux fur and had only used what you see for his pants. There was a reason the spool had been on sale.... only
11.5 inches was left on the spool.
COME ON, PEOPLE! 11.5 inches?!?!?!? Are you kidding me?!?!? At this point, I was looking for the hidden camera expecting "Funniest Home Videos" to pop out and say "Surprise!"
OK....backup plan. I had some faux fur fluff of something I'd picked up awhile ago at Joann's. PERFECT!.......not so much.....I cut what I needed and the darned stuff was so fluffy and unwieldy I have fluff and fur flying all over the place - in my mouth, in my eyes, on my clothes, in the air.....it looked like a snow storm had been through the house. I finally gave up and threw the material out. Then I cleaned my studio. Took a lint brush to all exposed flat surfaces, ran the vacuum and changed my clothes to get rid of all the fluff.
Ended up ordering more material on line because I couldn't find what I needed in town. In the meantime, the velcro dots arrived.
EUREKA!....not so much.....
The darned dots not only wouldn't stick to the fabric, they would't stick together to close the tunic.
Dad nabbit! (I was running out of backup plans). Snaps. I'd use snaps. SIGH. Another run into town loomed in my future - until I rummaged through my mother's sewing basket. Low and behold, she had exactly five tiny snaps PERFECT for the tunic! (Mom, I love you!). Problem solved.
Next was his belt - I had some faux leather and an old watch band. Used the buckle from the watch band as his buckle and made a belt that can be buckled and unbuckled. That was easy peasy.
Another dilemma presented itself - how to close the cape. I made cording out of DMC floss and glued silver toned beads to the ends to cover the knots.
PERFECT!
The backup fabric arrived for the trim for the cape - it was exactly what was needed - and actually looked better than the faux fur would have.
YIPPEE!!
Next - a hat. Woodland Santa = woodsy head covering. Stash comes through once again - braided baby boxwood garland.....
PERFECT!!
A
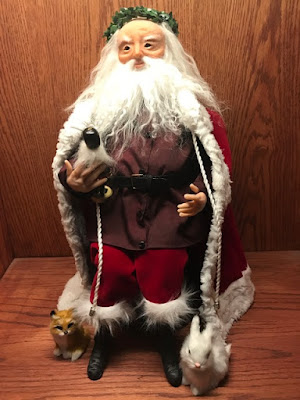
VERY long story........but here's my Woodland Santa - he's sitting on a twiggy/mossy bench (which you can't see) and holding a Nutcracker in his hand. Talk about a labor of love....
Thank you for sticking with me and reading this entire post.......now on to my next sculpt!


